…Or at least make them feel empowered!
Hi all!
Would you like to give a bit of power to your users so they can choose a layout they like?
Would you like to show your users that Softr is less “limited” as it seems?
The guide will be treated in 3 parts.
The first part will treat of 2 use cases: letting users choose between a table and a list layout (it can work with any other layout) and between a vertical header or a horizontal header.
The second part will treat of best practices as it mainly relies on user groups… which must be very well organized to make it work for complex use cases (aka as “many user groups apps”).
The third part will be about enabling/disabling In-App notifications, which is another feature I made here: New! In-App Notifications & Notification Center Feature
Note that there is not much code to insert.
0) Demo

1) Let your users choose between table and list layout and between vertical header and horizontal header
A) Update your users table in Airtable
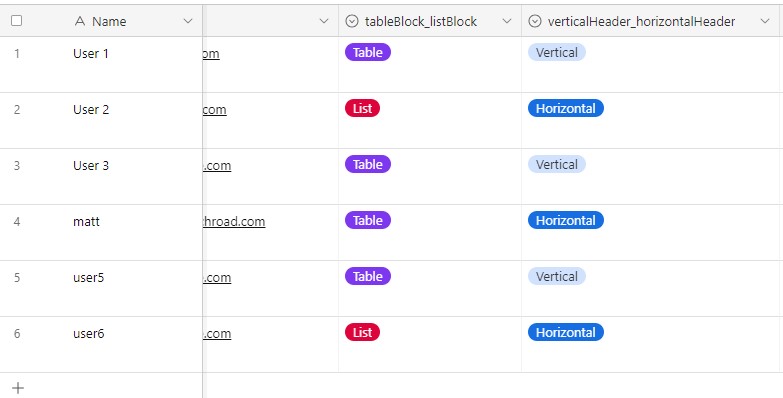
In the users table, add two single select fields.
One for table/list layout choice one for vertical header/horizontal header choice.
I named the first field “tableBlock_listBlock” and the second field “verticalHeader_horizontalHeader”
tableBlock_listBlock has two options: ‘Table’ and ‘List’
verticalHeader_horizontalHeader has two options: ‘Vertical’ and ‘Horizontal’
You can visualize it below:
B) Create a “Preferences” page
This page should be only visibible to logged-in users.
Add a list-details block.
In my use case I added a “list-details page with 3 column view” block.
You can visualize it below:
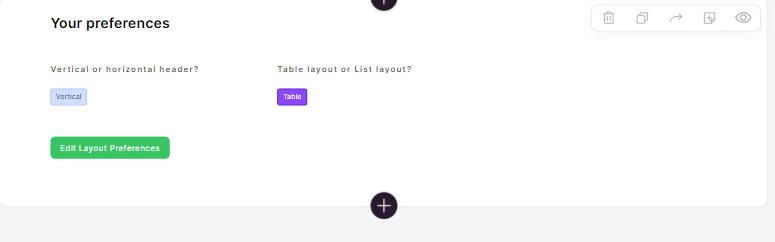
The ‘Edit Layout Preferences’ button is an edit record action button.
There are two dropdwon fields inside of it with synchronized options with the “tableBlock_listBlock” and the “verticalHeader_horizontalHeader” fields in Airtable.
Now add this script in the header custom code of the page:
Change list-details1 by your list-details ID/Name. You can update the 1000 by whatever you want. (it’s the time I set before the window.parent.location.reload occurs, after ‘update-record-success-list-details1’ has been trigerred)
<script>
window.addEventListener('block-loaded-list-details1', () => {
    window.addEventListener('update-record-success-list-details1', () => {
        setTimeout(() => {
            window.parent.location.reload();
        }, 1000);
    });
});
</script>
That’s it for the preferences page.
Now it’s time to setup user groups.
C) Create the right user groups
Note that using Softr user groups is one possibility. Hardcoding everything in the app settings is also another possibility. I won’t treat it in this guide… Softr is still a no-code tool after all ![]() .
.
We will create 4 user groups.
a) User group named ‘Horizontal header users’
Condition is: If logged-in user ⇒ verticalHeader_horizontalHeader ⇒ is ⇒ Horizontal (Case sensitive when you type it)
b) User group named ‘Vertical header users’
Condition is: If logged-in user ⇒ verticalHeader_horizontalHeader ⇒ is ⇒ Vertical (Case sensitive when you type it)
c) User group named ‘Table block users’
Condition is: If logged-in user ⇒ tableBlock_listBlock ⇒ is ⇒ Table (Careful it’s case sensitive)
d) User group named ‘List block users’
Condition is: If logged-in user ⇒ tableBlock_listBlock ⇒ is ⇒ List (Careful it’s case sensitive)
D) Change the visibility conditions of all concerned blocks so that they pertain to the right user group.
Create in all pages a vertical or horizontal version of the concerned header(s).
Then apply the right visibility condition to each of them.
Create in all pages a table or list version of the concerned blocks.
Then apply the right visibility condition to each of them.
E) Let your users reach the “Preference” page
For all logged-in users related headers, enable “Show user profile” and add a link to the “Preferences” page.
In my use case it’s inside the user profile modal but it can be inside anywhere else. Also I use an open modal option - medium size - to open the “Preferences” page
See it here:

2) Best practices
a) For Vertical/Horizontal headers choice
Super important: the Airtable field “verticalHeader_horizontalHeader” must have a default option. I chose “Horizontal” as default option. Up to you to make another choice.
This is easy if you use the same headers throughout the app (the default headers set up in the homepage).
If not ⇒ Brace yourself and check all your pages.
This is where custom code in the header of the app can facilitate your life, IF AND ONLY IF you name your the headers of your app the right way = always the same ID/Name throughout the app pages.
Also the user groups created for choosing a header layout can conflict with other user groups.
If you have a complex user groups set up , brace yourself as you will have to play with and/or conditions so that all specific user groups can have access to the header layout choice functionality.
b) For List/Table layout choice
Super important: the Airtable field “tableBlock_listBlock” must have a default option. I chose “Table” as default option. Up to you to make another choice.
Again, custom code at app level can facilitate your life, IF AND ONLY IF you name the table blocks and the list blocks of your app the right way = always the same ID/Name throughout the app pages.
Same as for header choice ⇒ the user groups created for choosing a block layout can conflict with other user groups
Also, be careful of the increased weight of your app, specifically if you have a lot of table/list blocks per page (Which I see way way too oftenly in Softr).
If some of you were thinking of using custom code to ⇒ the script you would add would hide the blocks according to your conditions. Hiding doesn’t mean it’s not loaded in the browser.
Using user groups instead of custom code is a gain of performance as with user groups blocks are not loaded if they don’t match the conditions you have created.
3) Update to the In-app notifications feature
This is only for those who have implemented the in-app notification feature that you can find here: New! In-App Notifications & Notification Center Feature
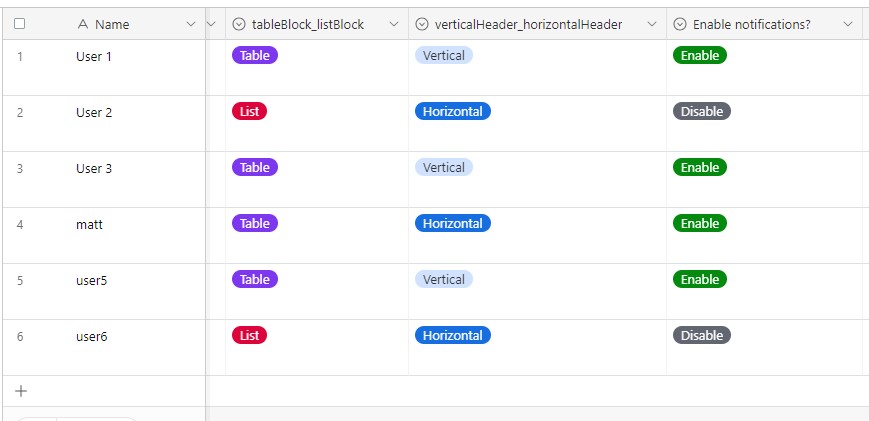
In Airtable, in the users table, add a single select field named “Enable notifications?”
This field has two options: Enable and Disable. Also, add a default value. I chose “Enable” (which should be the logic for almost any app) as a default value.
See it below:
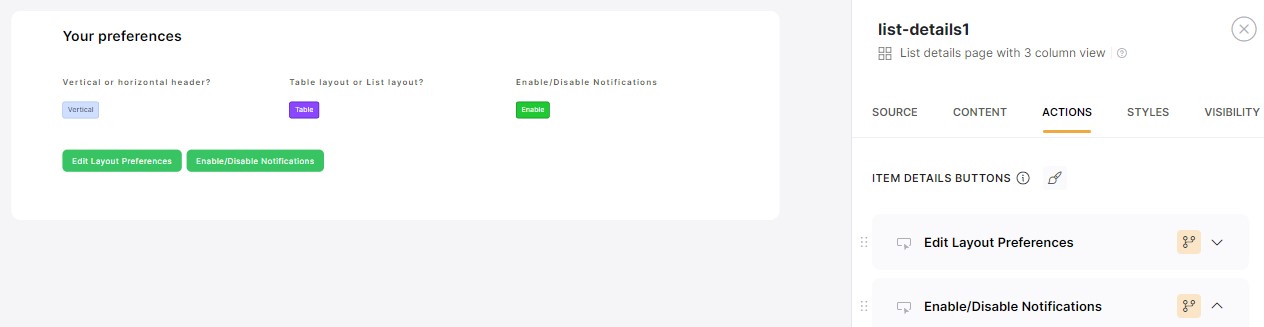
In your Preferences page in the Softr studo, inside the list-details block, add a tag field and link it to the “Enable notifications?” Airtable field.
Add another button with this text inside of it: “Enable/Disable Notifications”. It is an edit record action button with a dropdown field linjed to the “Enable notifications?” Airtable field (synchronized options).
After all these changes, your “Preferences” page should look like this:
For this use case I will only treat the case where the notification center is pulled from a floating button.
As you should already have a script in the header custom code of the app, replace this script by:
<script>
window.addEventListener('DOMContentLoaded', () => {
    const floatingButton = document.querySelector('.floating-button');
    if (window['logged_in_user'] && window['logged_in_user']['Enable notifications?'] === 'Enable') {
        floatingButton.style.display = 'block';

        const totalNotif = parseFloat(window['logged_in_user']['Rollup total NOT_READ  notif for the user']);
        if (totalNotif === 0) {
            floatingButton.classList.add('grey');
            floatingButton.textContent = '0';
            floatingButton.style.animation = 'none';
        } else {
            floatingButton.textContent = totalNotif;
        }

        const handleClick = () => {
            if (window.innerWidth < 991) {
                window.location.href = '/notification-center';
            } else {
                window.openSwModal('https://louie293.softr.app/notification-center', 'md');
            }
        };

        floatingButton.addEventListener('click', handleClick);
    } else {
        floatingButton.classList.add('grey');
        floatingButton.textContent = '0';
        floatingButton.style.animation = 'none';
    }
});
</script>
You can see that it’s not anymore:
if (window['logged_in_user']) { // Show In-app notifications if the user is logged-in
        floatingButton.style.display = 'block';
But:
if (window['logged_in_user'] && window['logged_in_user']['Enable notifications?'] === 'Enable') {
        floatingButton.style.display = 'block';
Now the user must be logged-in AND the option ‘Enable’ must be the value in the Airtable field ‘Enable notifications?’. Otherwise if this condition is not met the floating button for In-App notifications won’t appear to the user.
That’s it!
As always don’t forget this is a guide, a framework, you can adapt it to your own use cases.