Update to unofficial Tabs feature: Full customizable buttons + Responsive

Hi all,
Following what I did to create a tabs feature here: New - unofficial - feature: TABS - Hide/Show multiple blocks horizontally

(Here for the demo: https://test-play.softr.app/hide-show-tabs?recordId=recZV04ZNE3pvMnKM)

Here is the code, to be inserted in a custom code block, if you want buttons to change colors according to the one you clicked on + a slight better UI.
I made it so that most of the requested customization can be handled (background colors, font color, border radius, padding, gap between buttonsā€¦)

Note that I updated it so it is responsive: on mobile the buttons become a dropdown

<!DOCTYPE html>
<html>
<head>
    <style>
        @import url('https://fonts.googleapis.com/css2?family=Inter&display=swap');
        
         .button-group {
            display: flex;
            justify-content: left;
        }

        .button {
            background-color: #182939;
            color: white;
            font-family: 'Inter', sans-serif;
            font-size: 15px; 
            padding: 10px 20px; 
            margin-right: 30px;
            padding-top: 8px;
            padding-bottom: 8px;
            border-radius: 14px;
            border: none;
            cursor: pointer;
        }
        
        .button:hover {
        background-color: #f5e507;
        color: #182939;
       }
        
        .button:focus {
        outline: none;
       }

        .button:active, .active {
            background-color: #f5e507;
            color: #182939;
            outline: none;
        }
    </style>
</head>
<body>
    <div class="button-group">
        <button class="button active" onclick="runButton1Script()">Button 1</button>
        <button class="button" onclick="runButton2Script()">Button 2</button>
        <button class="button" onclick="runButton3Script()">Button 3</button>
    </div>
     <script>
    const buttons = document.querySelectorAll('.button');
        buttons.forEach(button => {
        button.addEventListener('click', function() {
            buttons.forEach(b => b.classList.remove('active'));
            this.classList.add('active');
        });
    });
</script>
</body>
<script>
    // hide blocks 
    window.addEventListener('DOMContentLoaded', (event) => {
        document.getElementById("table2").style.display = "block";
        document.getElementById("form2").style.display = "none";
        document.getElementById("chart2").style.display = "none"
    });

    function runButton1Script() {
        document.getElementById("table2").style.display = "block";
        document.getElementById("form2").style.display = "none";
        document.getElementById("chart2").style.display = "none";
        document.getElementById("table2").scrollIntoView("table2");
        console.log("Button 1 clicked"); 
    }

         function runButton2Script() {
        document.getElementById("form2").style.display = "block";
        document.getElementById("table2").style.display = "none";
        document.getElementById("chart2").style.display = "none";
        document.getElementById("form2").scrollIntoView("form2");
        console.log("Button 2 clicked");
    }
          function runButton3Script() {
        document.getElementById("chart2").style.display = "block";
        document.getElementById("table2").style.display = "none";
        document.getElementById("form2").style.display = "none";
        document.getElementById("chart2").scrollIntoView("chart2");
        console.log("Button 3 clicked");
    }

</script>
</html>
7 Likes

You can disable the automatic scroll to the right block by removing the line .scrollIntoView() within each runButtonScript function.

You can left aligned buttons by replacing justify-content: center by justify-content: left
Same logic for right aligned buttons

Space between buttons: use margin-right

And so on with all the style options

Demo: https://test-play.softr.app/tabs-with-custom-buttons

3 Likes

Hey @matthieu_chateau,

Thanks for sharing, itā€™s fantastic :slight_smile:

1 Like

I added the var iterator = document.evaluate() method.

Another method to make your JS snippets work when theyā€™re related to multiple Softr buttons

Demo and full code snippet here for this method: https://test-play.softr.app/tabs-for-softr-with-var-iterator-js-snippet

1 Like

Update: Fully responsive version

I chose to change the button container to a dropdown menu, only when viewed on mobiles.

Here is the demo (you will see the change on mobile. The desktop version doesnā€™t change, of course): https://test-play.softr.app/tabs-with-custom-buttons-responsive

Now what do you have to do to make it fully responsive? (Buttons to dropdown menu)

Enter this code in a custom code block (if you used the not responsive version, replace everything by whatā€™s below)

<!DOCTYPE html>
<html>
<head>
    <style>
        @import url('https://fonts.googleapis.com/css2?family=Inter&display=swap');
        
         .button-group {
            display: flex;
            justify-content: left;
        }

        .button {
            background-color: #182939;
            color: white;
            font-family: 'Inter', sans-serif;
            font-size: 15px; 
            padding: 10px 20px; 
            margin-right: 30px;
            padding-top: 8px;
            padding-bottom: 8px;
            border-radius: 14px;
            border: none;
            cursor: pointer;
        }
        
        .button:hover {
        background-color: #f5e507;
        color: #182939;
       }
        
        .button:focus {
        outline: none;
       }

        .button:active, .active {
            background-color: #f5e507;
            color: #182939;
            outline: none;
        }

        @media (max-width: 480px) {
            .button-group {
                display: flex;
                flex-direction: column;
                align-items: flex-start;
            }

            .button {
                display: none;
            }

            .dropdown {
                display: block;
                width: 100%;
                margin-top: 10px;
                padding: 10px 20px; 
                border-radius: 14px;
                border: none;
                background-color: #182939;
                color: white;
                font-family: 'Inter', sans-serif;
                font-size: 15px;
                cursor: pointer;
            }
        }

        @media (min-width: 481px) {
            .button-group {
                display: flex;
                justify-content: left;
            }

            .dropdown {
                display: none;
            }
        }
    </style>
</head>
<body>
    <div class="button-group">
        <button class="button active" onclick="runButton1Script()">Button 1</button>
        <button class="button" onclick="runButton2Script()">Button 2</button>
        <button class="button" onclick="runButton3Script()">Button 3</button>
        <select class="dropdown" onchange="runDropdownScript(this.value)">
            <option value="button1">Button 1</option>
            <option value="button2">Button 2</option>
            <option value="button3">Button 3</option>
        </select>
    </div>
    <script>
        const buttons = document.querySelectorAll('.button');
        buttons.forEach(button => {
            button.addEventListener('click', function() {
                buttons.forEach(b => b.classList.remove('active'));
                this.classList.add('active');
            });
        });

        function runDropdownScript(value) {
            switch(value) {
                case 'button1':
                    runButton1Script();
                    break;
                case 'button2':
                    runButton2Script();
                    break;
                case 'button3':
                    runButton3Script();
                    break;
                default:
                    break;
            }
        }
    </script>
</body>
</html>

<script>
    // hide blocks 
    window.addEventListener('DOMContentLoaded', (event) => {
        document.getElementById("table2").style.display = "block";
        document.getElementById("form2").style.display = "none";
        document.getElementById("chart2").style.display = "none"
    });

    function runButton1Script() {
        document.getElementById("table2").style.display = "block";
        document.getElementById("form2").style.display = "none";
        document.getElementById("chart2").style.display = "none";
        document.getElementById("table2").scrollIntoView("table2");
        console.log("Button 1 clicked"); 
    }

         function runButton2Script() {
        document.getElementById("form2").style.display = "block";
        document.getElementById("table2").style.display = "none";
        document.getElementById("chart2").style.display = "none";
        document.getElementById("form2").scrollIntoView("form2");
        console.log("Button 2 clicked");
    }
          function runButton3Script() {
        document.getElementById("chart2").style.display = "block";
        document.getElementById("table2").style.display = "none";
        document.getElementById("form2").style.display = "none";
        document.getElementById("chart2").scrollIntoView("chart2");
        console.log("Button 3 clicked");
    }

</script>
</html>
5 Likes

Amazing work Matthiew, this is much needed as you can see from my picture!

I wanted to ask, is there a way for a tab to display multiple lists? So for example, tab1 displaying ā€œlist 1ā€, ā€œlist2ā€ and ā€œlist3ā€ for example?

Yes! you just need to play with the ā€˜noneā€™ / ā€˜blockā€™ lines of the code

2 Likes

Iā€™m not sure if this is already a thread somewhere else but I was wondering actually if there was a description for how you configured this page: https://test-play.softr.app/hide-show-tabs?recordId=recZV04ZNE3pvMnKM

Specifically interested in how you have a list of projects at the top and can select various ones without leaving the page in order to view the associated record details? I feel like maybe itā€™s really obvious and I might be missing something basic but would LOVE to figure out how to recreate for a management dashboard I am configuring :slight_smile:

This is explained here: New - unofficial - feature: TABS - Hide/Show multiple blocks horizontally

Inside 2) ā€œOne pageā€ apps enabled

Doh! I donā€™t know how I missed thatā€¦ think I got so excited implementing the other goodies on that page LOL itā€™s SO pretty, though!


Thank you again!

Hi Matthieu ā€“ this is great! Iā€™m a bit stuck on how to update the part though for the mobile responsive version. I had been implementing your different versions step by step to ensure it worked and it did (yay!). But when I went to do the responsive version, I donā€™t know how to link to the lists in the new script you provided (as it seems I had to replace all the code ā€“ unless I did that wrong). Iā€™m a novice at code so itā€™s not intuitive to me.

Hi!

My bad, I was not clear enough for the code to insert for the responsive side. I updated it (the main script was missing)

1 Like

Thank you! Much appreciated.

Do the blocks need to be forms, charts, or lists, @matthieu_chateau ?
It seems to only work with those blocks and not when I add a CTA block, could that be?

Thanks so much for building this!! Such a game changer!!! :smiley:

Update: it seems like I simply canā€™t set up visibility settings within the blocks?

Hi Tim,

It works with any block + visibility settings and conditional filters apply normally. The code has 0 effect on visibility conditions.

The logic of your visibility conditions might need to be reflected in the custom code.
If you have different visibility settings for different blocks and you donā€™t reflect them in the custom code, it wonā€™t work. But this is just visibility conditions applying normally, the code doesnā€™t change it itself.

To make it more simple: you can add one custom code block (related to the tab feature) for each of your visibility conditions. And you just hide/show the blocks that meet the visibility conditions for each of your blocks.

1 Like

Aah thatā€™s amazing! Great to know! Thank you!!!
Have you seen anyone posting such a custom code in the community forum for your tabs feature?
I wouldnā€™t know where to start to write a custom code for visibility options. I still donā€™t really have coding skills :smiley:

You donā€™t need to write any code => everything should follow the normal Softr visibility conditions.

The only thing that might be needed is to duplicate the custom code block for the tabs feature each time you want to display different visibility conditions for a set of blocks (with the same visibility conditions they have)

1 Like

Aaah, that makes sense!!
It will be a bit messy to create that for three user groups, but at least it works then :smiley: Amazing! Thanks so much!!

Hey @matthieu_chateau :wave:
Iā€™m struggling to combine this version with the code you shared to click one of the buttons via ?tab=chart within the URL. I thought I could just replace the JS code with the one you provided, but I seem to be missing something. Any tip how I could make this work? :slight_smile:
Would reeeeally appreciate it!!

Thanks so so much in advance!!

@matthieu_chateau thank you so much for writing and sharing this code, it was exactly what I was looking for!
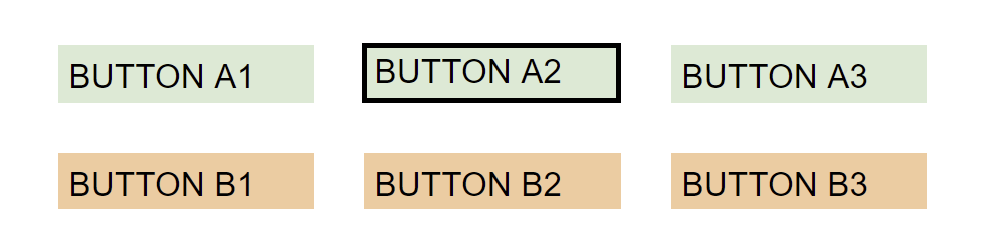
Iā€™m now trying to take it one step further, by creating a secondary row of buttons that shows up when one of the primary buttons is clicked and then those secondary buttons are showing again other blocks (related to the secondary buttons). So itā€™s kind of a nested row of buttons.

The screenshot is a schematic example of what I made: buttons A1, A2 and A3 are primary buttons, using the code that you wrote. Buttons A1 and A3 are pointing to regular blocks, while button A2 is pointing to a new code block which has your code but then for the secondary buttons B1, B2 and B3, which each are pointing to a secondary regular block. This means that when Button A2 is clicked, none of the primary A1 or A3 blocks are shown but instead the secondary buttons are shown. When clicking on the secondary buttons, those secondary blocks are shown.

This is working well, the only thing that I donā€™t know how to solve is that after button A2 is clicked and then one of the B-buttons is clicked and shown, clicking on A1 or A3 keeps visible the block of the last visible B button (below the correct A1 or A3 block which is correctly visible).

I hope that makes sense and I hope anyone here can point me in the right direction.