Hi!
As the “import from CSV” feature is not yet native in Softr, let’s make it happen, thanks to Make!
To make the guide more interesting I added a limitation to the file upload: it must be a csv file AND the total amount of rows should not be superior to 100.
0) Demo

1) Setup in Airtable
For the sake of the guide I created a dedicated table. Obviously, it can be adapted to a table you already have.
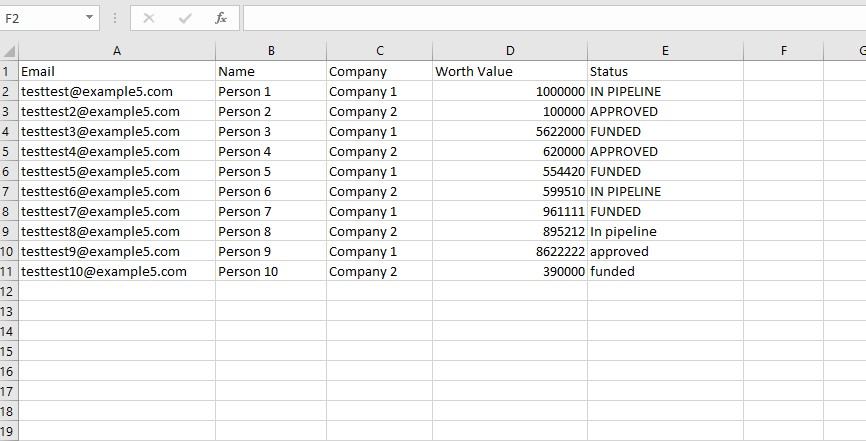
2) CSV File setup
5 columns and each column has a header (for this specific use case).
Also I inserted, on purpose, a typo in the last rows - Status column. I did it to show you how to solve some possible errors of the user.
When the CSV is uploaded, the Status column values will be pulled in a single select field in Airtable. Problem: if your users are not paying attention, the Status field in Airtable will be populated by hundreds of unrelevant options.
Note that the use of a CSV Template, made available to your users, is very important.
Some process/education is mandatory to make them use this feature properly.
Otherwise the release of such feature won’t have the desired user adoption.
3) Setup of the Softr pages
Create 3 (maybe 4) pages.
a) Upload page
Use a customizable form (with “Send to Make” option). Here, the form has the ID/Name ‘form1’
I chose to enable the option “show message” on form submit.
Add this script in the footer of the page. It will allow the redirection to happen from make webhook responses.
<script>
    window.addEventListener('submit-form-success-form1', (e) => {
        const response = e.detail.response || {};
        const data = response.data;
        if (data && data.redirect) {
            window.location.href = data.redirect;
        }
    });
</script>
Also, as the number of columns + the headers label + the number of rows + the status values are not to be chosen by the user, you will need to create a button - inside a cta block for example - that would open a new page for tutorial and/or to give a csv template (inside of a modal would be the best).

b) Successful upload page
I added two buttons:
- One to upload new data, if the user wants it or if the user journey you created allows it.
- One to go to the page where the results will be displayed. For the sake of the guide I created a dedicated page for the results (/csv-import-result) but it can be the users’s dashboard or anything else.
A csv import can be long to be processed in Make (if number of rows > 50 or if you adapt your scenario to populate multiple linked tables in Airtable, which I often do for clients - not a rare case)
So you will need to take this in consideration. As a consequence, on click on the second button, a loading screen is shown during 6 seconds.
Here is the complete code to be added in the header:
<link rel="stylesheet" href="https://cdnjs.cloudflare.com/ajax/libs/font-awesome/5.15.3/css/all.min.css">

<div id="loading-spinner2">
  <i class="fas fa-spinner fa-spin"></i>
  <p class="loading-text2">Please wait, your data is being processed...</p>
</div>


<style>
#loading-spinner2 {
  position: fixed;
  top: 0;
  left: 0;
  width: 100%;
  height: 100%;
  background-color: white;
  opacity: 1;
  display: none;
  justify-content: center;
  align-items: center;
  z-index: 9999;
}

#loading-spinner2 i {
  font-size: 50px;
  color: #000000;
}

.loading-text2 {
  font-family: Arial, sans-serif;
  font-size: 24px;
  font-weight: bold;
  color: #000000;
  margin-left: 20px;
  margin-top: 20px;
}

@media (max-width: 768px) {
  #loading-spinner2 {
    flex-direction: column;
  }

  .loading-text2 {
    margin-left: 0px;
  }
}
</style>

<script>
document.addEventListener('DOMContentLoaded', function() {
  var spinner = document.getElementById('loading-spinner2');
  var button = document.querySelector('#cta1 .MuiButtonBase-root:nth-child(2)'); // I point to the second button of #cta1. Adapt it if needed

  spinner.style.display = 'none';

  button.addEventListener('click', function(event) {
    event.preventDefault();
    spinner.style.display = 'flex';
    setTimeout(function() {
      window.location.href = '/csv-import-result'; // change it by your own url path
    }, 6000); // meaning 6 seconds, you can adapt it to your use case
  });
});
</script>
Image of the page:

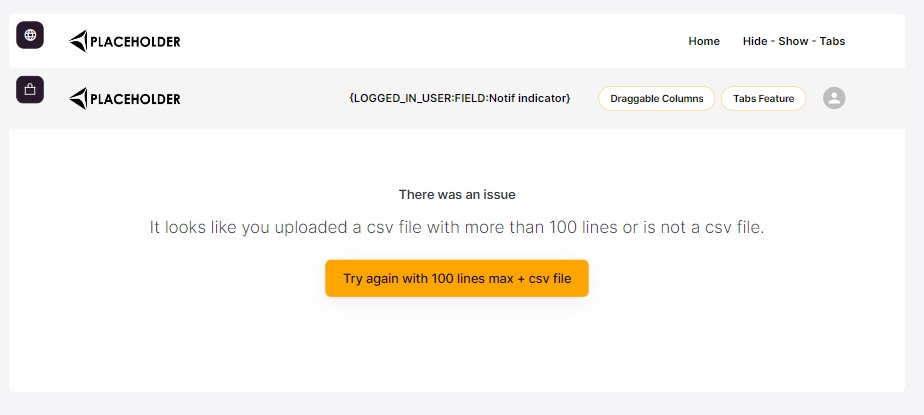
c) Failed upload page
In case the uploaded file is not a csv or if the number of rows is superior to 100 ⇒ the user will be redirected here.
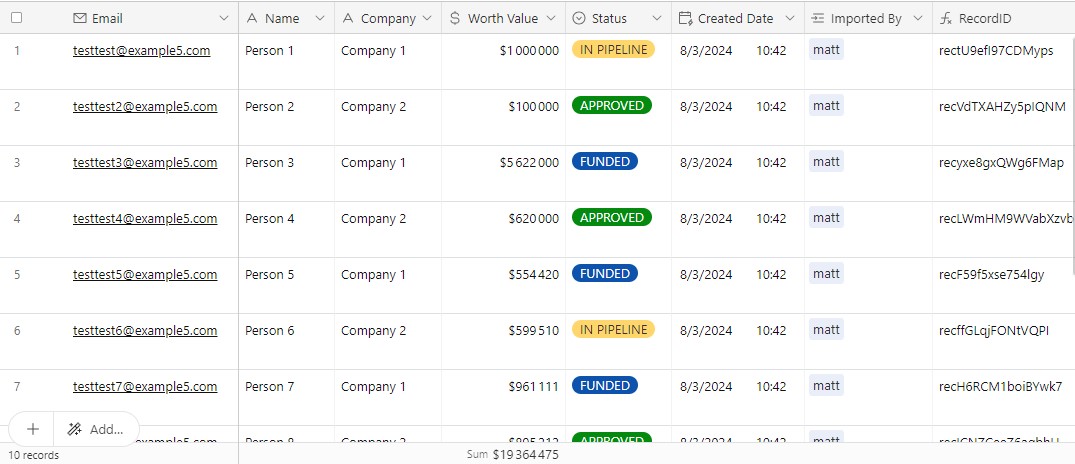
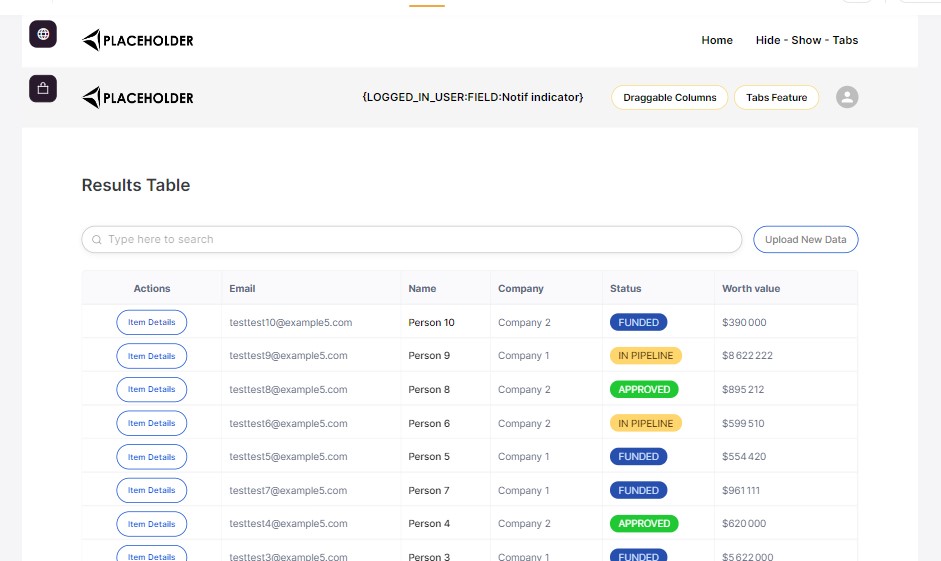
d) Upload results page - If it doesn’t already exist
I used a table, linked to my Airtable. I added a top bar button (open page) if the user needs to upload a new set of data.
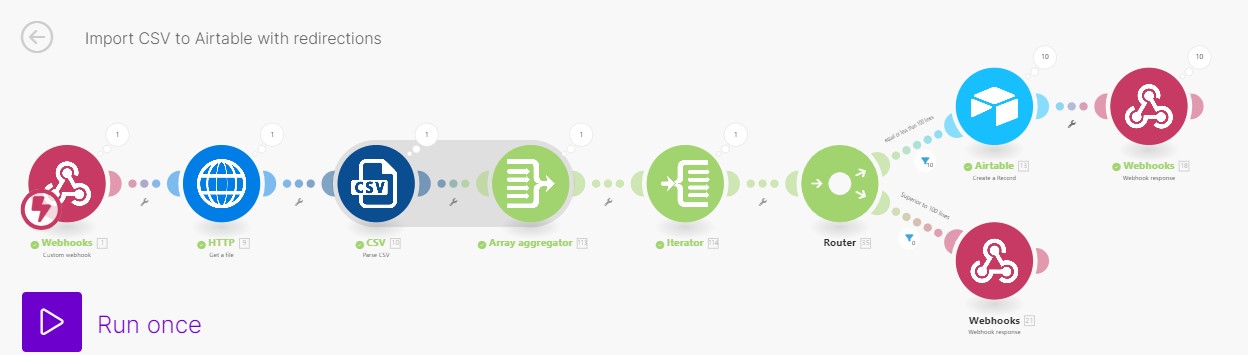
4) Setup in Make
Here is the global scenario:
a) Webhook module
Create a webhook and make a test in the customizable form you created in Softr.
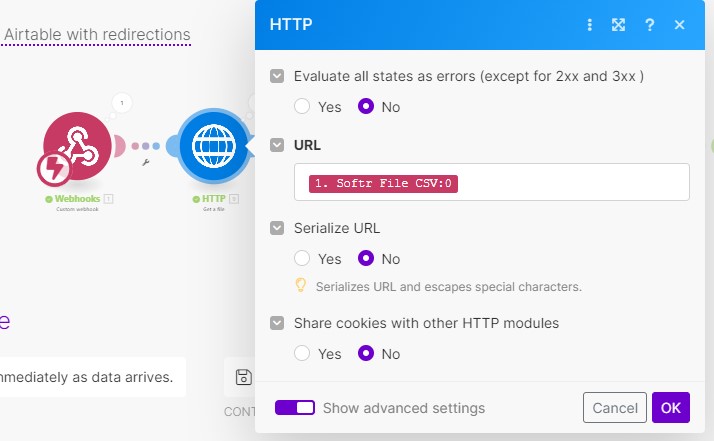
b) Http module - Upload file
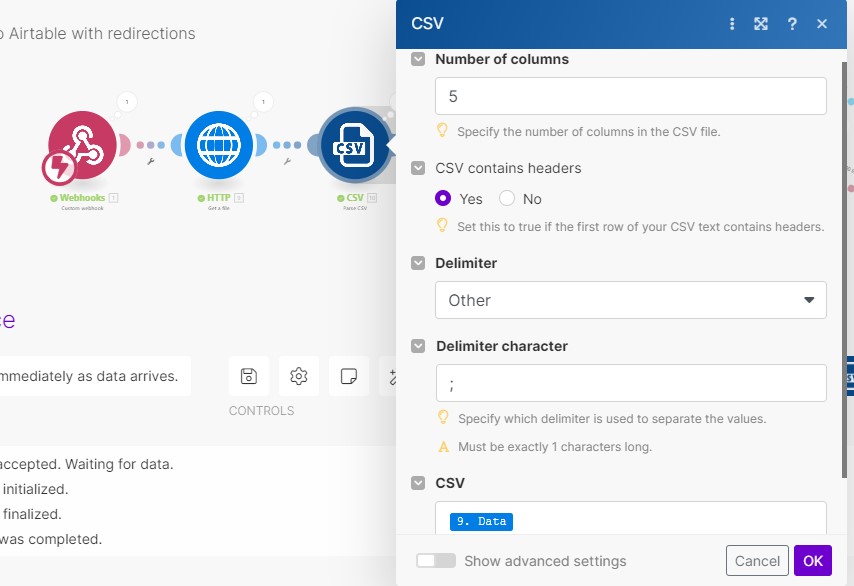
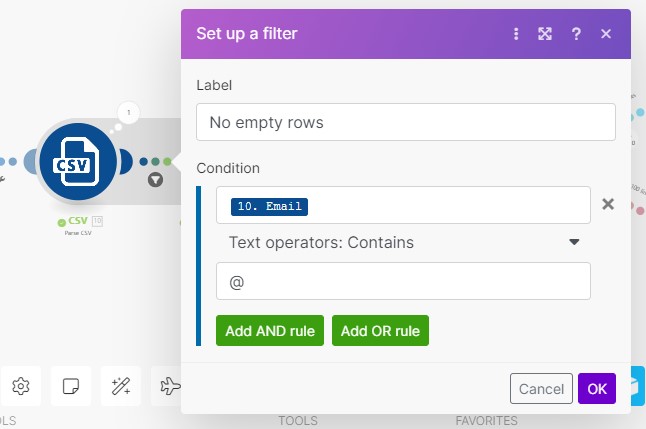
c) CSV module - Parse CSV + No empty rows
The number of columns must be equal to the number of columns in the csv file (that’s why you need to give a help text to your users).
Same for the delimiter, though even if the delimiter is “;” it should work with a coma.
The filter below ensures that any empty row is not counted as a data to be processed
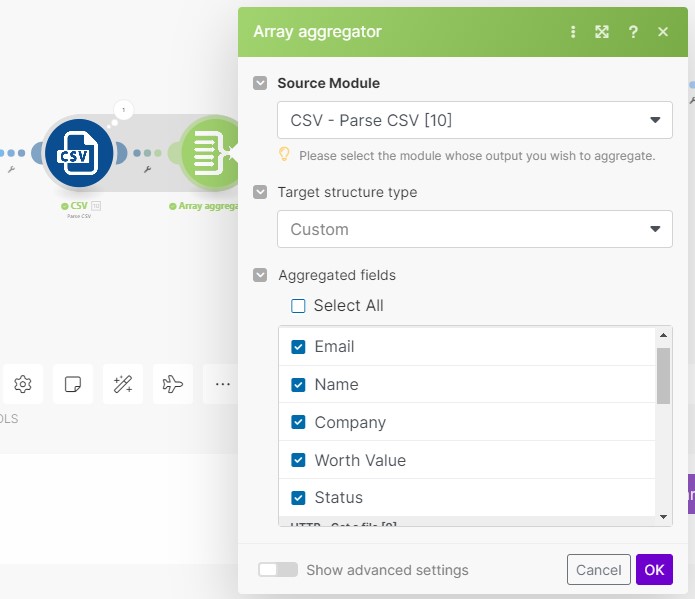
d) Array agregator module
This module is useful to for f) Router and conditions
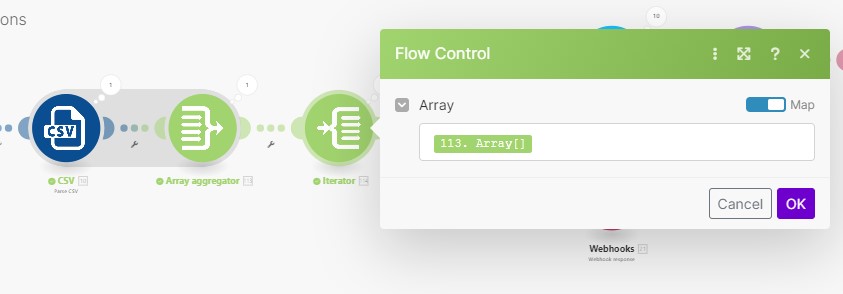
e) Iterator module
As there is an aggregator module linked to the parse CSV module, you need to add an iterator module afterwards.
The 113. Array[] comes from the aggregator module.
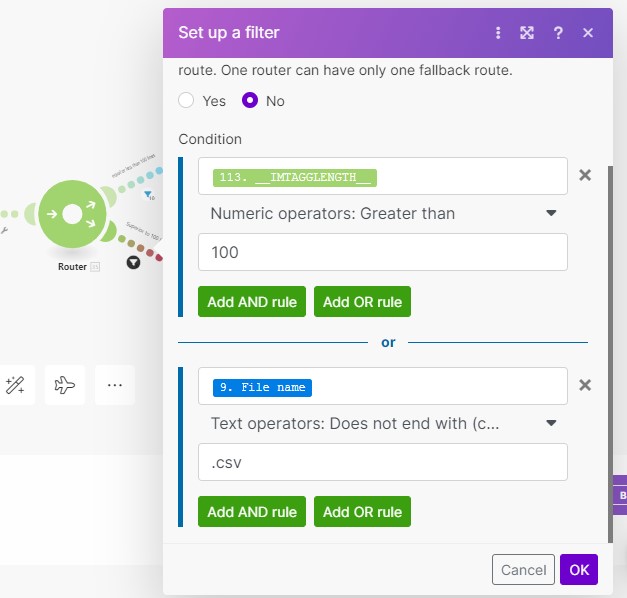
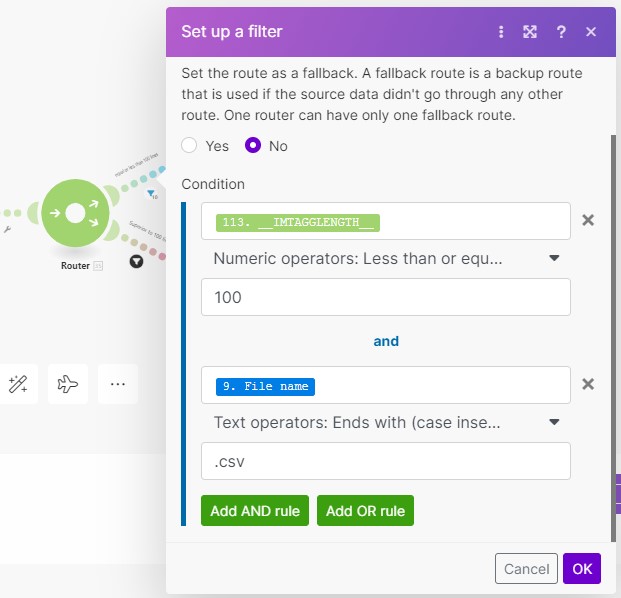
f) Router and conditions
11”.IMTAGGLENGTH comes from the aggregator module
File name comes from the http module
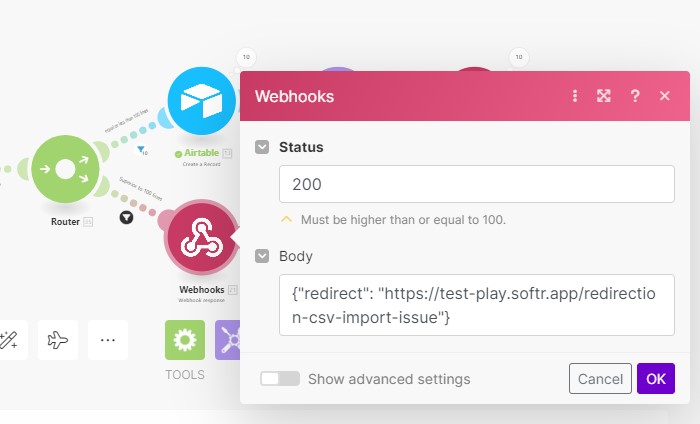
g) Upload fails - webhook response module
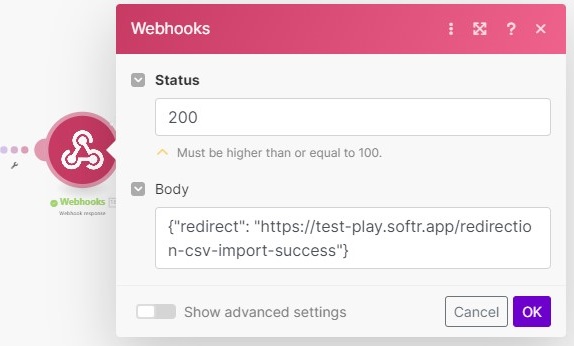
Update the body with your own url path
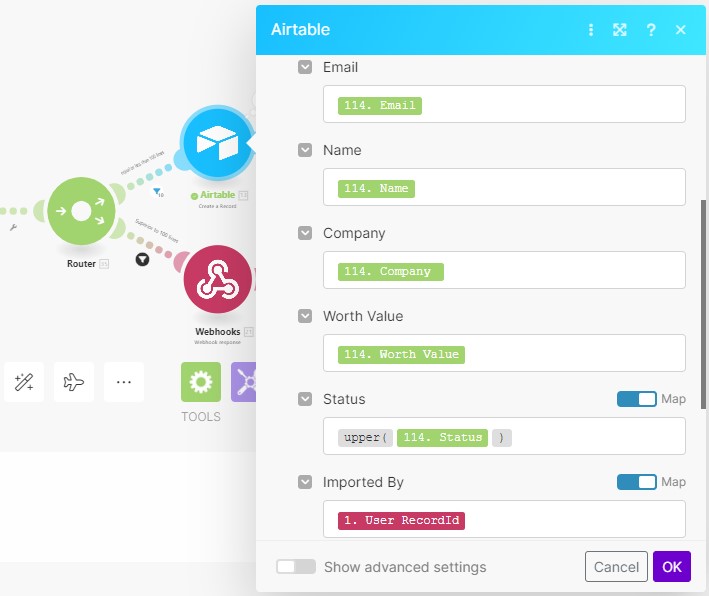
h) Airtable module - Create record
All data comes from the iterator module, except for the “Imported By” field => the value comes from the very first webhook module and by the hidden field in the Softr customizable form.
Also, for the field “Status” => I added a upper(value) formula so that it ensures the Status value is always uppercase (and so thatit doesn’t create a new value in Airtable, each time there is a typo).
i) Upload success - webhook response module
Update the body with your own url path